Dub Train Studio, Mark II
 |
Construction of Dub Train Studio Mark II photo gallery - updated weekly.
|
Visit Dub Train Records on MySpace for more info!

|

|

|

|
|
Phase 2 Workbench
|
Old Zinsco
|
Main Panel
|
J-Box Cutout
|
| 1))) After moving all the junk stored in the main room of the garage into the control room, I began to tear down the rest of the existing shelving. The workbench was detached from the wall and mounted on wheels, and it was finally time to install the new power service! | |||

|

|

|

|
|
Through The Roof
|
Deep Trench
|
Tangly Wires
|
New House Panel
|
| 2))) The service transfer went smoothly, with a bit of ditch digging in between rainstorms. The crusty old Zinsco panel came away smoothly, and the new panel went in without too much fuss. | |||

|

|

|
|
|
Service Drop
|
Meter Block
|
Final Closing
|
|
| 3))) The new service drops in at the garage, rather than travelling over the house, and a 100-amp feeder powers the house, which is now run off a subpanel. The old meter block was transferred to the side of the garage. On to Phase 17! | |||

|

|

|
|
|
Shelf Reclamation
|
Safety Pile!
|
Expensive Paneling
|
|
| 4))) One more bit of demolition remained before we could begin to frame the live room. A full set of workbench & shelving was removed, denailed, and stacked neatly for blocking use later. I made a fun play area for kids out of the remaining naily boards! | |||

|

|

|

|
|
Pile O'Panels
|
New Facade
|
Inside View
|
Rollup Closeup
|
| 5))) The first step for the main room was to get rid of the overhead garage door and replace it with a roll-up steel door from the good folks at Automatic Door & Gate in Everett. The Brothers W came over to help frame in the garage door opening and install the new roll-up door. | |||

|

|

|

|
|
Airlock Wall
|
Monster Jambs
|
Beam Staining
|
Beam Levelling
|
| 6))) With the garage cleared, we quickly framed up the interior wall just inside of the roll-up door which will form a small "airlock" between the outside world and the live room. One more sidebar project remains: create a shingled overhang on the garage exterior so folks won't get wet while they're loading in! | |||

|

|

|

|
|
Beam Installation
|
Rafter Hanging
|
Side View
|
Shingley Goodness
|
|
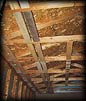
7))) Taking advantage of a break in the rainy weather, we hoisted the heavy 10' beam into place and used Timberloks to fix it to the knee joints. I spent another day cutting rafters to fit (using the rafter square!), then sheathed and shingled the eave structure. |
|||

|

|

|

|
|
Entry Light
|
Security Light
|
Junction Box
|
Cable Tree
|
|
8))) Now that the exterior and interior walls are framed, I can run the rest of the electrical circuits. First up is a new entry light with a motion sensor for those late night load-ins, plus an upgrade to the rusty old security light. Then a little cable prepwork and some home runs, and it's just about ready for inspection! |
|||

|
|

|

|
|
Blocking Key
|
Lots O' Blocks
|
Glassblock Redux
|
Caulking Session
|
|
9))) I began March by cutting and installing blocking in the rafters. These will catch & support the shelving, curtain hardware and track lighting in the finished live room. I also constructed four more glassblock windows for the live room's north wall. Natural Light = Good! |
|||

|

|

|

|
|
Raised Entry
|
Sleeper Layout
|
Solid Footing
|
Foam Panels
|
|
10))) Only one step remains before I can install the live room flooring system - the side door must be lifted by about 1.5 inches to clear the new floor. Luckily this went smoothly, and I began to cut 2x4 studs into the correct lengths to lay down the floor grid. |
|||

|

|

|

|
|
OSB Panels
|
The Bench Game
|
New Drill
|
Classic Panasonic
|
|
11))) A couple of trips to Home Depot and I was ready to lay the foam insert panels and the OSB subflooring. I also picked up a new cordless drill to replace the creaky old Makita, and just in time: I'll be driving thousands of screws into the flooring, walls, soundboard and drywall over the next few weeks! Luckily the old boombox is still going strong... |
|||

|

|

|

|
|
Gold Screws
|
The Dimpler
|
New Subfloor
|
Earthquake!
|
|
12))) Three days, five pounds of gold screws, one partially disassembled jigsaw and a six-pack of Mountain Dew later, the OSB subfloor is complete and firmly fastened down. This will be the working floor for a while, until it's time to install the masonite flooring panels sometime this Spring. |
|||

|

|

|
|
|
Live Room
|
South Wall
|
North Wall
|
|
|
13))) I wrapped up the final electrical connections and passed my inspection: it's time to insulate! I put up plastic-lined 16" bats in the stud bays, then Rob helped install some thicker R-19 insulation in the ceiling. We threaded it around all the blocking and stapled it into place. |
|||

|

|

|

|
|
Trusses Shot
|
Rafter Vents
|
Airlock Electrics
|
Airlock Sheathing
|
|
14))) I finished up the last bit of insulation and began sheathing the outer wall in OSB to seal up the back side of the fiberglass bats. After some careful measuring & cutting, I slid each panel into place and fastened them to the airlock wall. Happy Saint Patrick's Day! |
|||

|

|

|

|
|
Airlock Lights
|
Power Outlets
|
Paneling Tools
|
Dusty Soundboard
|
|
15))) With the sheathing up on the outside wall, I took the time to complete a couple of electrical circuits. The airlock lights give a great submarine-type effect, and the burly commercial-grade 20 amp power outlets are a big improvement over the extension cords. Rob took a break from his grueling puppet schedule to help me install soundboard panels on the ceiling - the dustiest job ever! |
|||

|

|

|

|
|
Dub Threshold
|
Airlock Paint
|
MDF Slats
|
MDF Dustpile
|
|
16))) I spent the last few days of March installing the wall soundboard, and also finishing the southern end of the airlock, where tools will go when the mobile workbench is disassembled for the last time. I also ripped a couple of 1/2" MDF panels into 2" wide 8-foot long strips - the new most dustiest job ever! |
|||

|

|

|

|
|
Grader Time
|
Wall Slats
|
Cut Table
|
East Wall
|
|
17))) A welcome interruption from the slat installation came in the form of a city road grader, which scraped the bumpy alleyway and filled in the ruts. I got most of the walls done, with the help of my trusty temporary work station, and I'm looking forward to hanging some sheetrock! |
|||
Phase 1 • Phase 2 • Phase 3 • Phase 4